Last Updated on February 29, 2024 by teamobn

It is amazing how seemingly modest inventions can make a huge difference. I am not talking about fancy, huge machinery; I am referring to simple machines with simple concepts. Truth be told, they have revolutionized how some things work – such as gardening.
Hand planters, for example, are very helpful. This means you will not have to bend down, or crouch, to sow and plant seeds. You get your work done in a systematic manner minus the back pain.
If you are looking for something that can help you plant small to medium-sized seeds, here’s a project for you. This hand-held seed planter is easy to make. With very basic material needs, it is fairly inexpensive, too.
Hand-held seed planters offer a multitude of advantages for gardeners, making them invaluable tools for planting tasks. Here’s an in-depth look at their key benefits:
1. Efficiency: Hand-held seed planters streamline the planting process, allowing gardeners to sow seeds quickly and accurately. Unlike manual planting methods that require individual seed placement, seed planters can sow multiple seeds simultaneously, saving considerable time and effort, particularly in large garden areas.
2. Precision: One of the most significant advantages of hand-held seed planters is their ability to ensure precise seed placement and spacing. This precision results in uniform plant growth and optimal use of garden space, reducing the likelihood of overcrowding or gaps between plants. With adjustable settings, gardeners can tailor the depth and spacing to suit the requirements of different crops, ensuring consistent results.
3. Reduced Strain: Traditional planting methods, such as manual sowing or using handheld tools, can strain the hands and wrists, especially during prolonged planting sessions. Hand-held seed planters are designed with ergonomic features, such as comfortable handles and lightweight construction, to minimize fatigue and discomfort for the user, allowing for extended use without undue strain.
4. Versatility: Hand-held seed planters are versatile tools suitable for a wide range of seeds, from tiny seeds like lettuce or carrots to larger seeds like beans or corn. Gardeners can adjust the planter’s settings to accommodate various seed sizes and planting depths, making it suitable for diverse planting needs in vegetable gardens, flower beds, or seedling trays.
5. Conservation of Seeds: By ensuring accurate seed placement, hand-held seed planters help conserve seeds by minimizing wastage. Gardeners can avoid over-planting or double-seeding, resulting in better seed utilization and reduced seed costs over time.
6. Ease of Use: Hand-held seed planters are crafted with user-friendly designs, featuring straightforward mechanisms that are a breeze to operate. Novice gardeners can swiftly grasp the tool’s functionality, minimizing the learning curve and facilitating efficient seed planting right from the start. Whether you’re new to gardening or an experienced enthusiast, these planters offer intuitive handling, ensuring a seamless planting experience for all.
7. Increased Productivity: Hand-held seed planters play a vital role in boosting productivity in the garden. By streamlining the planting process and enhancing planting accuracy, these tools enable gardeners to cover larger areas in less time. As a result, gardeners can accomplish more tasks efficiently, whether it’s sowing seeds for a new crop or transplanting seedlings.
This increased efficiency frees up valuable time and resources, allowing gardeners to focus on other essential aspects of gardening, leading to more productive and enjoyable gardening experiences overall.
Hand-held seed planters offer numerous advantages, including enhanced efficiency, precision, versatility, and user comfort, making them indispensable tools for gardeners looking to optimize their planting processes and achieve successful harvests.
Are you ready to craft your hand-held seed planter? With just a few materials and simple steps, you can create a versatile tool to streamline your planting process and enhance productivity in the garden. Let’s get started on this rewarding DIY project!
How to Make Your Hand-Held Seed Planter
Contents
Materials:
- 1 pc ½” PVC, 48” long (or depending on your height)
- 2 pcs inline-T fitting
- 1 pc 8” tubing
- 1 pc 5 ½” tubing
- 1 pc elbow
- 1 pc 6” tubing
- 1 pc Tapered wooden plug
- 1 pc long, narrow bolt (cut the head off)
- 2 pcs washers
- 2 pcs nuts
- 1 pc tin can
- Duct tape
- Glue
Tools:
- Drill
Click on any image to start the lightbox display. Use your Esc key to close the lightbox.
Steps:
1. Prepare the PVC Pipe
Cut the ½” PVC pipe to the desired length, approximately 48” long or adjust according to your height.
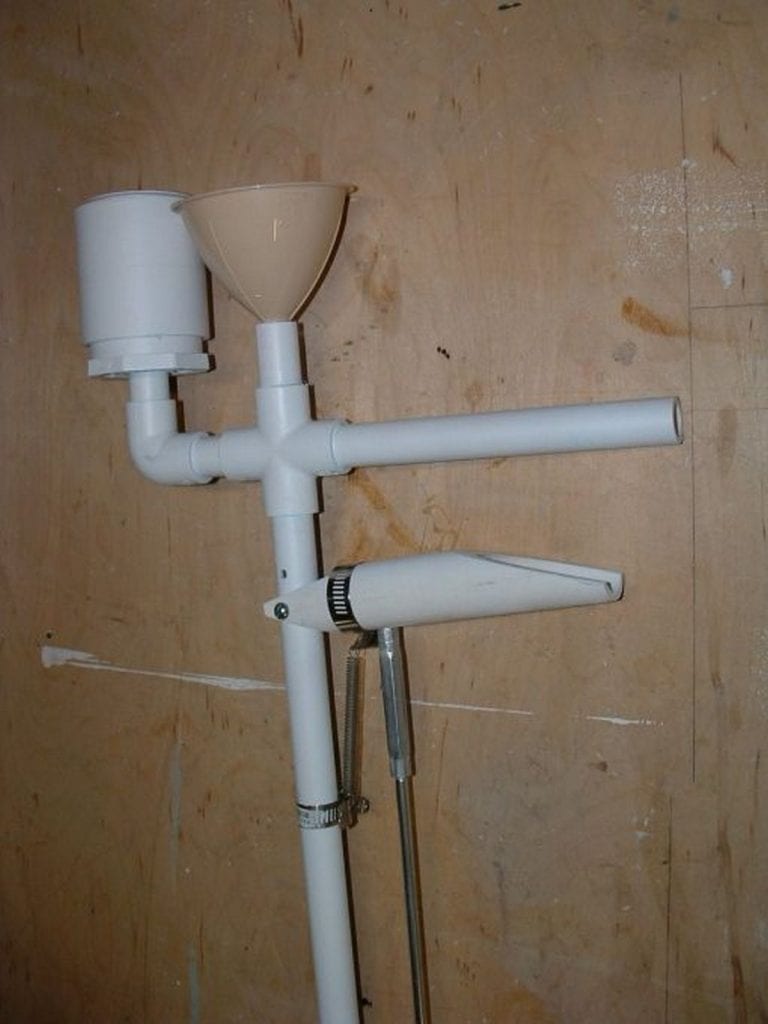
2. Assemble the Handle
Attach one inline-T fitting to each end of the PVC pipe. Insert the 8” tubing into one end of the inline-T fitting to create the handle. Secure the tubing in place with glue or duct tape.
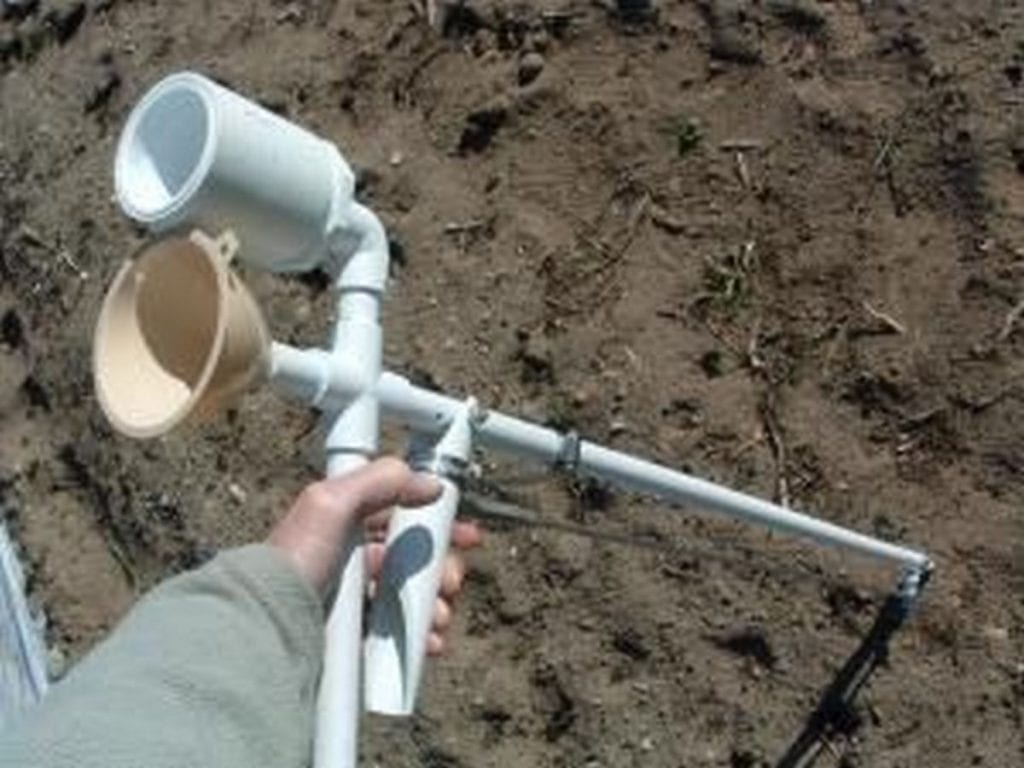
3. Create the Seed Dispenser
Attach the 5 ½” tubing to the remaining opening of one inline T fitting. Connect the elbow to the other end of the 5 ½” tubing. Insert the 6” tubing into the elbow to extend the seed dispenser.
4. Add the Seed Holder
Cut the bottom of the tin can to create a shallow container. Drill holes in the bottom of the tin can for seed distribution. Secure the tin can to the end of the 6” tubing using duct tape or glue.
5. Attach the Seed Dispenser
Connect the seed dispenser assembly (5 ½” tubing, elbow, and 6” tubing) to the inline-T fitting on the handle.
6. Secure the Bolt
Insert the long, narrow bolt through the centre of the tapered wooden plug. Place a washer on each end of the bolt and secure them in place with nuts. Drill a hole in the centre of the inline-T fitting on the handle. Insert the bolt into the hole and tighten the nuts to secure the seed dispenser in place.
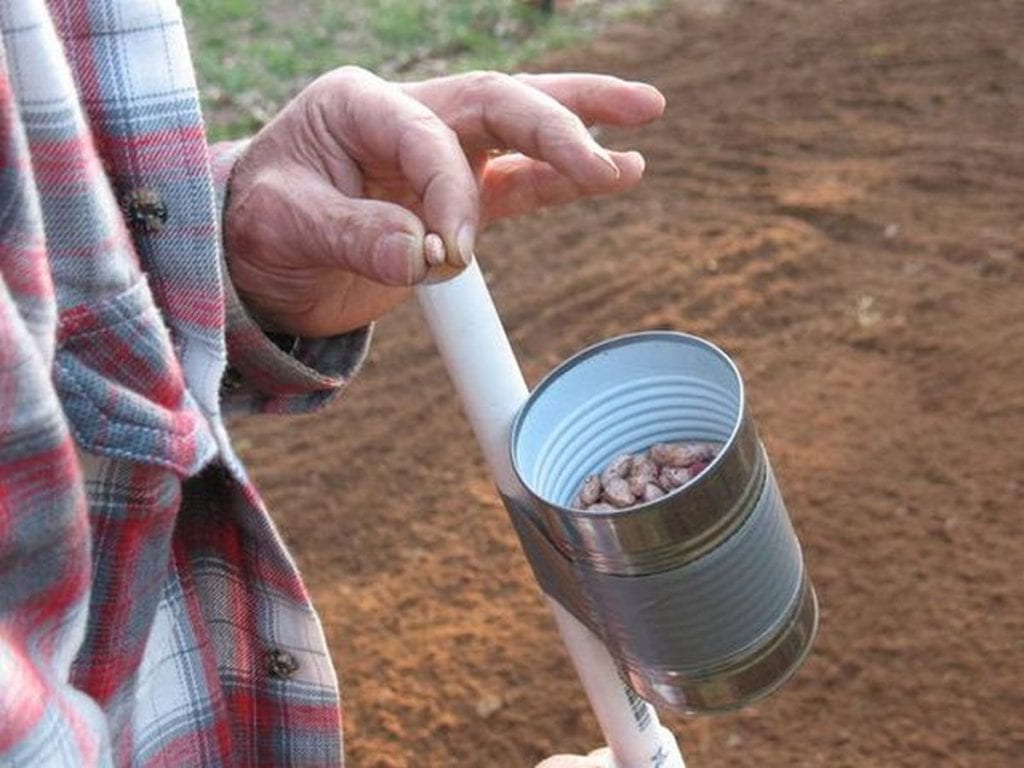
7. Test and Adjust
Fill the tin can with seeds and test the seed planter by gently shaking it to dispense seeds. Adjust the size of the holes in the tin can or the length of the tubing as needed to control seed distribution.
With these steps, you will have constructed an efficient hand-held seed planter ready to assist you in your gardening endeavours. Adjustments can be made based on personal preferences and specific gardening needs.
A special shout out to Sensible Survival for sharing tips and strategies on how to make a hand-held seed planter.


Maintaining Your Hand-Held Seed Planter
Maintaining a hand-held seed planter is crucial to ensure its optimal performance and longevity. Proper care and regular maintenance can help prevent issues such as clogging, misalignment, or wear and tear, allowing the planter to function smoothly throughout the planting season. Here are some essential maintenance tasks for keeping your hand-held seed planter in top condition:
1. Cleaning: After each use, thoroughly clean the seed planter to remove any soil, debris, or residue that may have accumulated during planting. Use a brush or compressed air to dislodge any stuck seeds or particles from the seed dispensing mechanism, tubes, and nozzles. Ensure that all components are free of dirt and organic matter before storing the planter.
2. Lubrication: Lubricate moving parts and joints of the seed planter regularly to reduce friction and prevent rust or corrosion. Apply a small amount of lubricating oil or silicone spray to pivot points, springs, and other mechanical components to ensure smooth operation. Avoid using excessive lubricant, as it may attract dirt and cause clogging.
3. Inspecting for Damage: Periodically inspect the seed planter for signs of damage, such as cracks, bent parts, or worn-out components. Pay attention to the condition of the seed dispenser, tubes, handles, and adjustment knobs. Replace any damaged or malfunctioning parts promptly to prevent further issues during planting.
4. Adjustment and Calibration: Check the calibration and adjustment settings of the seed planter to ensure accurate seed placement and spacing. Test the planter with a sample batch of seeds to verify that it is dispensing seeds at the desired rate and depth. Make any necessary adjustments to the planting depth, spacing, or seed flow rate according to the specific requirements of the seeds being planted.
5. Storage: Store the hand-held seed planter in a clean, dry, and well-ventilated environment when not in use. Avoid exposing the planter to extreme temperatures, direct sunlight, or moisture, as these conditions can damage the components and affect performance. Use protective covers or cases to shield the planter from dust, dirt, and debris during storage.
6. Replacing Wear Parts: Over time, certain components of the hand-held seed planter may wear out or become damaged due to regular use. Keep spare parts on hand, such as springs, nozzles, or seals, to replace worn-out or defective components as needed. Refer to the manufacturer’s instructions or user manual for guidance on proper part replacement and installation.
7. Regular Testing and Maintenance: Schedule regular testing and maintenance sessions for the hand-held seed planter to ensure its continued reliability and efficiency. Perform routine checks on the planter’s functionality, calibration, and performance to identify any issues early and address them promptly. By staying proactive with maintenance, you can minimize downtime and maximize the lifespan of your seed planter.
Proper maintenance is essential for keeping a hand-held seed planter in optimal working condition. By following these maintenance tips and best practices, you can ensure that your seed planter remains efficient, accurate, and reliable throughout the planting season, helping you achieve successful and productive gardening outcomes.
The Wrap Up
Embarking on the journey of building an efficient hand-held seed planter in seven steps promises a practical and fulfilling experience for both gardeners and farmers. This DIY project not only brings the satisfaction of creating something useful from scratch but also offers a myriad of benefits that can significantly impact planting endeavours.
First and foremost, constructing your own seed planter empowers you with the ability to save time and effort. By streamlining the seed planting process, you can cover more ground in less time, allowing for increased productivity and efficiency in your garden or field. This time-saving aspect is particularly valuable during busy planting seasons when every minute counts.
Moreover, a DIY seed planter offers the flexibility to customize its functionality to suit your specific planting needs and preferences. Whether you’re sowing seeds for different crops, adjusting planting depths, or varying seed spacing, having a tool that can be tailored to accommodate these requirements enhances your overall planting experience. This level of customization ensures that you have a versatile and adaptable tool at your disposal, capable of meeting the unique demands of your gardening or farming operation.
Beyond its practical benefits, the process of building a hand-held seed planter can also be a rewarding and enjoyable endeavour. Engaging in DIY projects allows you to exercise your creativity and problem-solving skills while honing your craftsmanship. The sense of accomplishment that comes from successfully constructing a functional tool with your own hands is immensely gratifying and fosters a deeper connection to your gardening or farming activities.
As you follow the seven steps to construct your seed planter, you will gain valuable insights into the mechanics of seed planting and equipment design. This hands-on learning experience not only enhances your understanding of planting techniques but also equips you with practical skills that can be applied to future projects.
So, building an efficient hand-held seed planter offers a host of benefits that make it a worthwhile endeavour for gardeners and farmers. From time savings and improved efficiency to customized functionality and the satisfaction of DIY craftsmanship, this project has much to offer.
By following the seven steps outlined, you can create a versatile and effective tool that simplifies the seed planting process and enhances productivity in your garden or field, ultimately contributing to a more successful and enjoyable planting experience.
Frequently Asked Questions
1. What materials do you need to build a hand-held seed planter?
To build a hand-held seed planter, you will need basic materials like PVC pipe, inline-T fittings, tubing, elbow fitting, wooden plugs, narrow bolts, washers, nuts, tin can, duct tape, and glue.
2. How long does it take to build a hand-held seed planter?
The time it takes to build a hand-held seed planter depends on your familiarity with the materials and tools, as well as your skill level. Generally, it can take a few hours to complete the construction process, including gathering materials, cutting and assembling PVC pipes, and attaching the necessary components.
3. Do you need any special tools to build a hand-held seed planter?
While building a hand-held seed planter does not require specialized tools, having access to basic tools such as a saw, drill, and screwdriver can make the process easier. Additionally, having a measuring tape and marker for precise measurements and markings is recommended.
4. Can you customize the design of the hand-held seed planter?
Yes, one of the advantages of building your own hand-held seed planter is the ability to customize the design to suit your specific needs and preferences. You can adjust the length of the PVC pipe, modify the size and shape of the seed dispenser, and add additional features or accessories as desired.
5. How durable is a hand-held seed planter?
The durability of a hand-held seed planter depends on the quality of materials used and the construction method. PVC pipes are known for their durability and resistance to corrosion, making them suitable for outdoor use. By ensuring that the components are securely attached and properly sealed, you can create a sturdy and long-lasting seed planter.
To bolster the durability of the hand-held seed planter, attention to detail during construction is crucial. This includes using quality fittings and adhesives to assemble the components securely. Regular maintenance, such as inspecting for signs of wear and tear and promptly addressing any issues, can also prolong the lifespan of the planter.
7. What types of seeds can you plant with a hand-held seed planter?
A hand-held seed planter can be used to plant a wide variety of seeds, including vegetables, flowers, and herbs. The size of the seed dispenser can be adjusted to accommodate different seed sizes, allowing for precise planting of seeds ranging from small to large.
The ability to customize the seed dispenser makes the hand-held seed planter a valuable tool for gardeners of all skill levels. Whether you are planting a small vegetable patch or sowing seeds across a large field, this tool provides consistent and accurate seed placement, saving time and effort while maximizing seedling success rates.
Furthermore, the hand-held seed planter’s versatility extends beyond traditional gardening applications. It can also be used for seeding cover crops, planting wildflowers to attract pollinators, or even distributing grass seeds for lawn repair or establishment.
8. Is a hand-held seed planter suitable for large-scale planting?
While a hand-held seed planter is primarily designed for small-scale gardening and planting projects, it can also be used for larger areas with some modifications. By increasing the length of the PVC pipe and seed dispenser, you can cover more ground with each planting pass, making it suitable for medium-sized gardens or plots. However, for very large-scale planting operations, specialized equipment may be more efficient.