Last Updated on March 1, 2024 by teamobn
There are graveyards for mangled bicycles in vacant lots throughout China. Local governments have long pondered over how to dispose of millions of abandoned bicycles: the result of an initial oversupply to support the country’s bike share program.
Bicycles, whether broken or not, have major recyclable value here in the U.S. because their metal scraps and tires can be still be repurposed. But there are other, clever ways to repurpose your old wheeled steed, especially if you are one of those cyclists for whom bikes have a special, sentimental value.
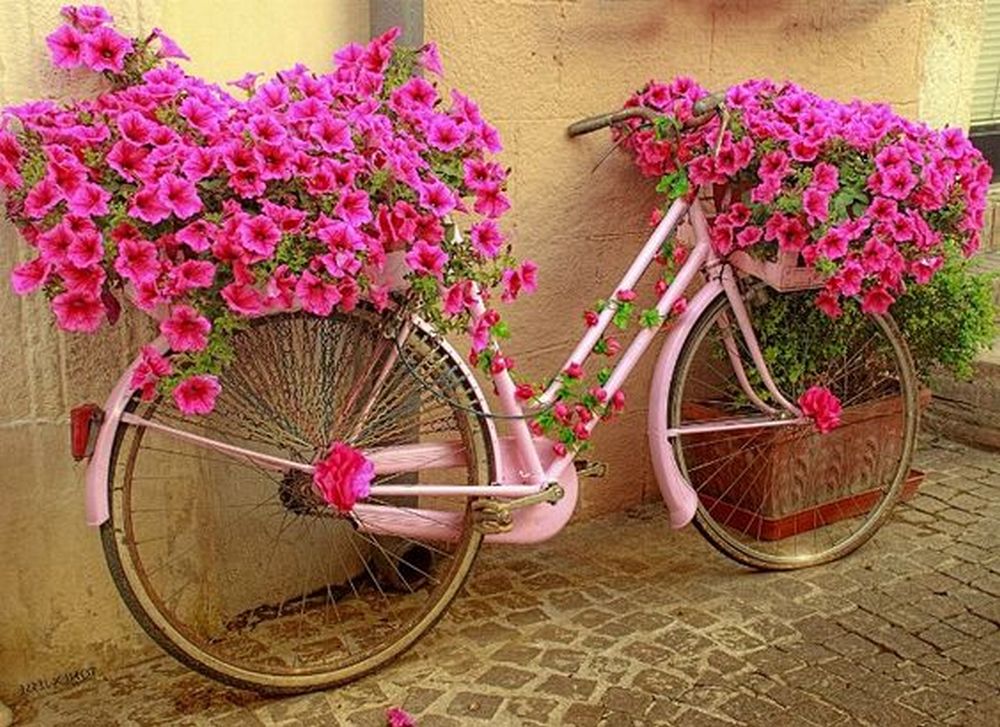
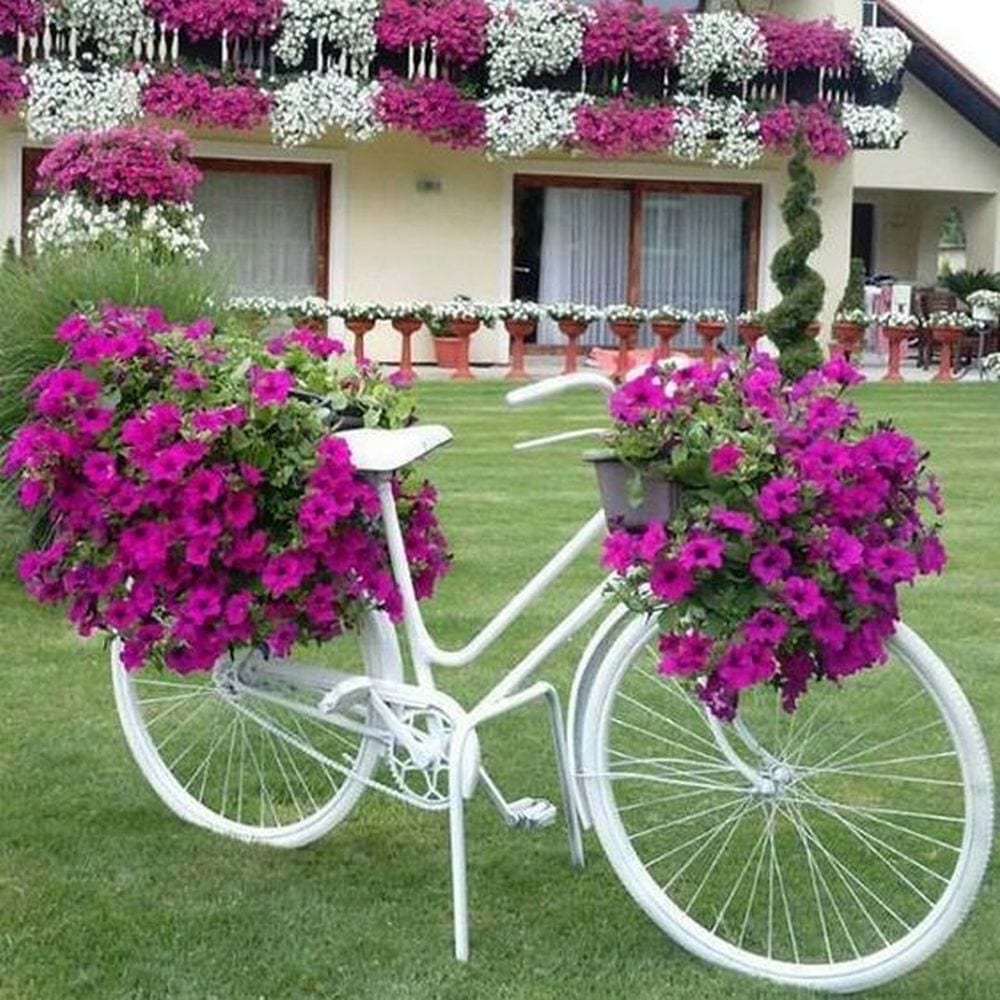
Do you have an old bicycle that’s been sitting inside your garage for years? It’s time to take it out – but not for a ride. You can breathe new life into it and turn it into something functional and beautiful.
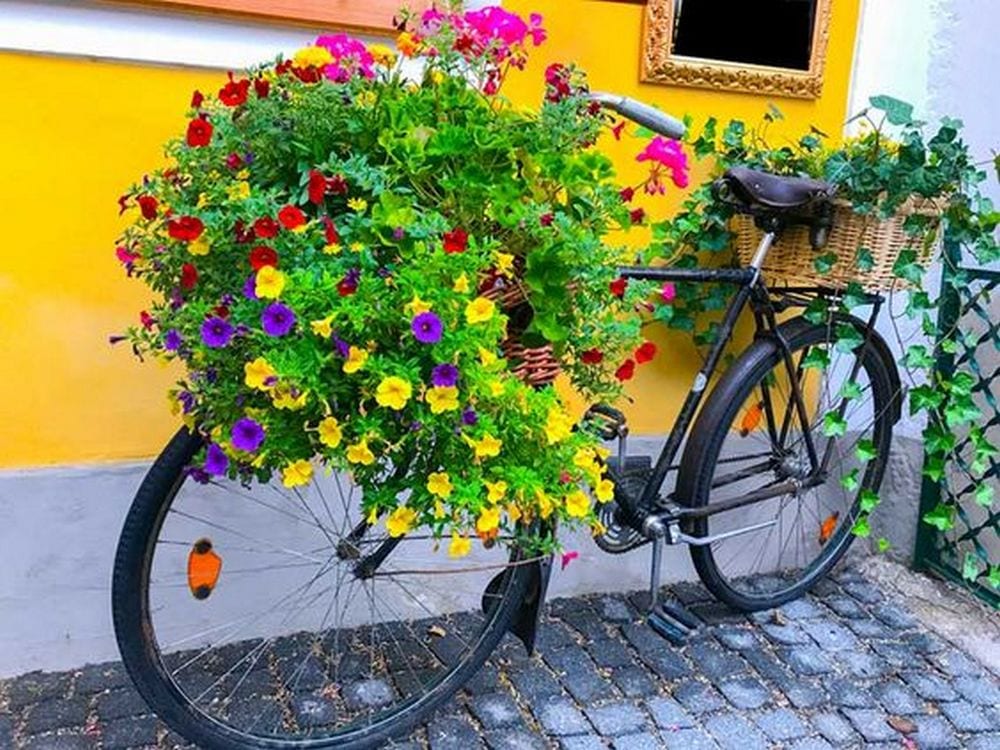
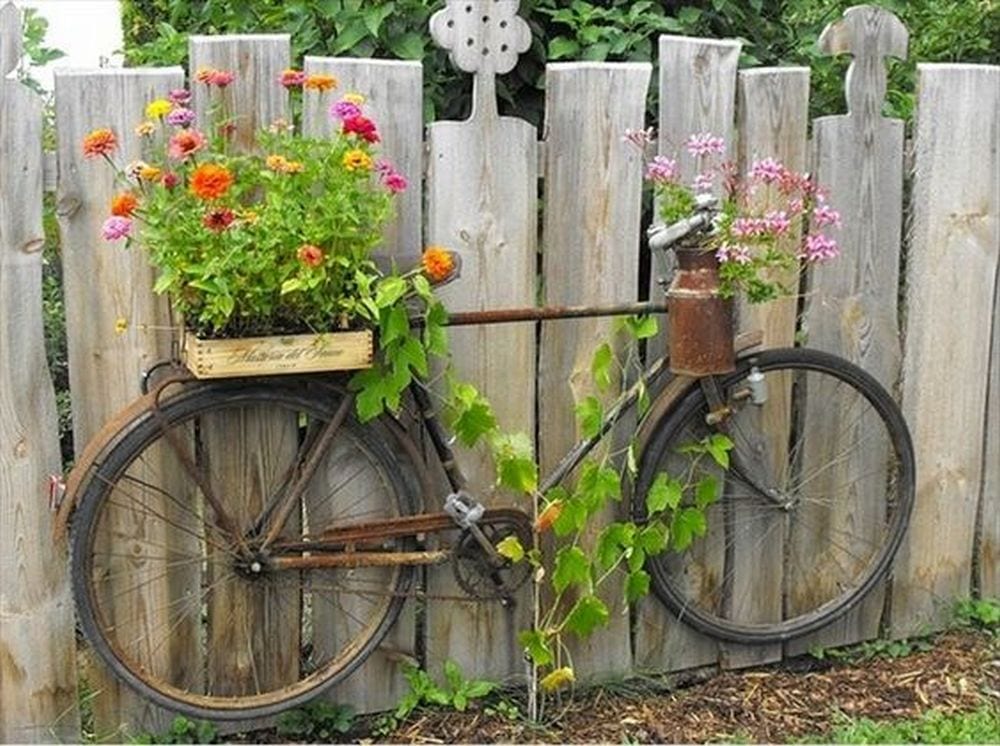
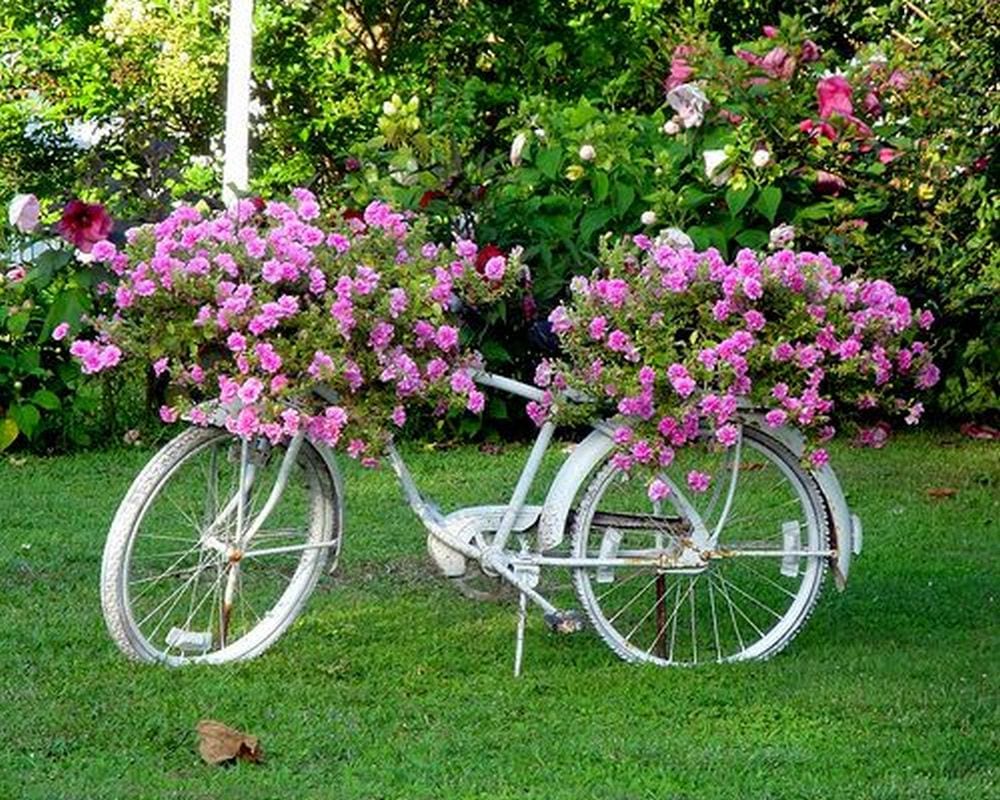
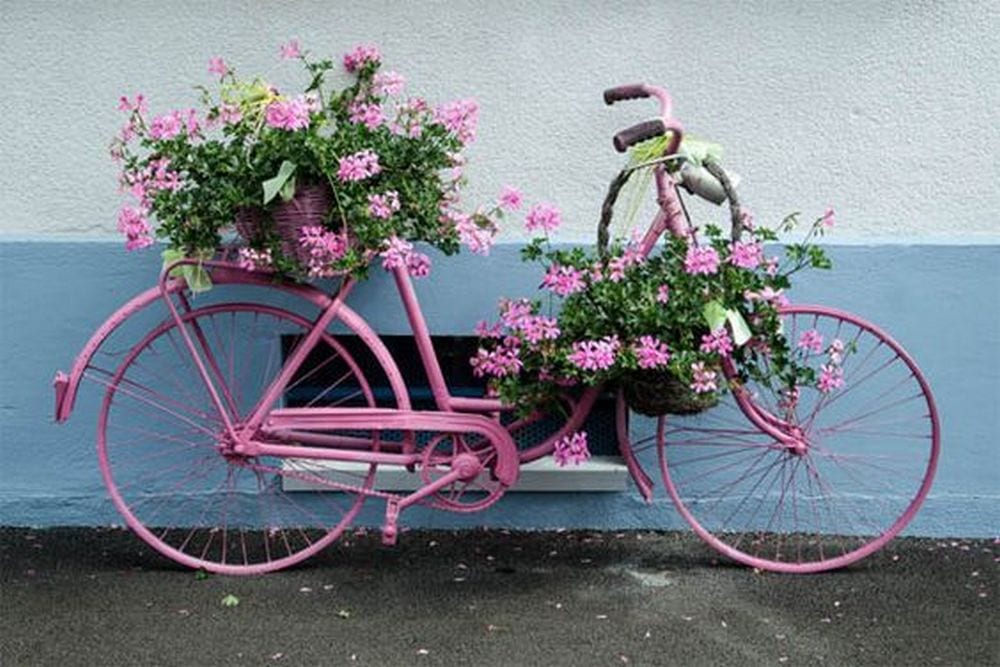
With that old bicycle of yours, you can have both a garden décor and a functional planter. Imagine how beautiful that would look! Simply put in a basket at the front and at the back, plant gorgeous flowers, and in no time, you’ll have something stunning.
This bicycle planter is a very easy project. You can have one done in less than an hour. You can even ask your kids to help out. It will be a great bonding activity with the family.
Advantages of a Bicycle Planter
Contents
Creating a bicycle planter offers numerous advantages, making it a delightful and practical addition to any garden or outdoor space:
1. Creative Expression: Making a bicycle planter allows you to unleash your creativity and personalize your garden decor. You can choose the colours, plants, and decorative elements that best suit your style and preferences, resulting in a unique and eye-catching display.
2. Repurposing Old Bikes: Transforming an old or unused bicycle into a planter is a sustainable and eco-friendly practice. Rather than discarding the bike, repurposing it as a planter gives it new life and prevents it from ending up in a landfill, promoting environmental conservation.
3. Cost-Effective: Making a bicycle planter can be a cost-effective gardening solution. Instead of purchasing a new planter, you can repurpose an old bike that you already own or acquire one inexpensively from a thrift store or garage sale. This DIY approach allows you to create a charming garden feature without breaking the bank.
4. Vertical Gardening: A bicycle planter provides a unique opportunity for vertical gardening, allowing you to maximize space in small gardens or urban environments. By utilizing the baskets or frame of the bike for planting, you can create a lush vertical display of flowers, herbs, or vegetables, adding visual interest and greenery to any outdoor space.
5. Portability: One of the advantages of a bicycle planter is its portability. Unlike traditional planters or garden beds, a bicycle planter can be easily moved and repositioned, allowing you to change the look and layout of your garden with ease. This flexibility is especially useful for renters or those with limited outdoor space.
6. Conversation Starter: A bicycle planter is sure to be a conversation starter and focal point in your garden. Its whimsical and unconventional design is bound to attract attention and admiration from visitors, making it a charming and memorable feature of your outdoor space.
7. DIY Satisfaction: Making a bicycle planter is a rewarding DIY project that offers a sense of accomplishment and satisfaction. From selecting the bike and plants to assembling and decorating the planter, each step allows you to exercise your creativity and craftsmanship, resulting in a handmade masterpiece that you can take pride in.
8. Versatility: A bicycle planter is incredibly versatile and can be customized to suit your specific needs and preferences. Whether you prefer a rustic, vintage, or modern look, you can adapt the design and decor of the planter to reflect your style and personality, creating a truly unique and personalized garden feature.
Overall, making a bicycle planter is a fun, creative, and eco-friendly way to add beauty and charm to your garden while repurposing old materials and expressing your individuality. With its numerous advantages, a bicycle planter is a delightful addition to any outdoor space, bringing joy and character to your garden for years to come.
Materials for making a bicycle planter:
- An old bike
- Two baskets
- Moss (sphagnum or decorative Spanish)
- Potted plants of your choice
- Plastic grocery bags (to line the baskets)
- Ribbons
- Anything that would support the bike
- Wires
How to Make a Bicycle Planter
Repurposing an old bicycle into a charming planter is a creative and eco-friendly way to add character to your garden or outdoor space. With just a few simple materials and some creativity, you can transform an unused bike into a whimsical garden feature that will delight visitors and passersby. Follow these five easy steps to create your own bicycle planter:
Step 1: Prepare the Baskets
Before attaching the baskets to the bike, line them with plastic grocery bags to prevent soil from leaking out. This will also help retain moisture and protect the baskets from water damage. Once lined, fill the baskets with potting soil, leaving enough space to accommodate the roots of your potted plants. Arrange the plants in the baskets, making sure to space them evenly and consider their eventual growth patterns.
Step 2: Attach the Baskets to the Bike
With the baskets filled and the plants arranged to your liking, it’s time to attach them to the bike frame. Position one basket at the front of the bike, where the handlebars meet the frame, and the other at the rear, where the seat meets the frame. Use wires or other sturdy fasteners to secure the baskets in place, ensuring they are stable and won’t tip over when the bike is moved or exposed to wind.
Step 4: Add Decorative Touches
Once the baskets are securely attached, it’s time to add decorative touches to your bicycle planter. Use moss to cover the soil and fill in any gaps between the plants, creating a lush and cohesive look. You can also add ribbons or other embellishments to the bike frame and baskets to personalize your planter and enhance its visual appeal.
Step 5: Display and Enjoy
With your bicycle planter complete, find the perfect spot to display it in your garden, on your patio, or even indoors if you prefer. Position the bike in a sunny location where it will receive adequate sunlight for the plants to thrive. Water the plants regularly and keep an eye on their growth, pruning as needed to maintain their shape and size. Sit back, relax, and enjoy the beauty of your DIY bicycle planter as it brings a touch of whimsy and greenery to your outdoor space.
Click on any image to start the lightbox display. Use your Esc key to close the lightbox.


Thank you to Our Fairfield Home and Garden for sharing tips and strategies on how to make a bicycle planter.
Themes for Your Bicycle Planter
1. Vintage Garden
Embrace the nostalgia of yesteryears by incorporating vintage elements into your bicycle planter theme. Choose an old-fashioned bicycle with a classic frame design and rusty patina. Pair it with rustic wooden baskets and fill them with cottage-style flowers like daisies, lavender, and geraniums.
Add finishing touches such as burlap ribbons, antique garden tools, and vintage signage to complete the charming look.
2. Urban Oasis
Create a modern and stylish vibe with an urban-inspired bicycle planter theme. Opt for a sleek and minimalist bike design in a bold colour like black or metallic silver. Pair it with contemporary wire baskets or geometric planters for a sleek, industrial look.
Fill the baskets with trendy succulents, air plants, and ornamental grasses for low-maintenance greenery. Add urban accents such as concrete planters, metallic accents, and edgy graffiti art to enhance the modern aesthetic.
3. Bohemian Retreat:
Infuse your outdoor space with bohemian flair by embracing a free-spirited bicycle planter theme. Choose a whimsical bicycle with colourful accents, intricate details, and playful patterns. Pair it with eclectic woven baskets, macramé plant hangers, and vintage textiles for a boho-chic vibe.
Fill the baskets with an assortment of vibrant flowers, lush foliage, and trailing vines for a lush, jungle-inspired look. Add bohemian accessories such as dreamcatchers, beaded curtains, and eclectic artwork to create a cozy and inviting retreat.
4. Coastal Escape
Bring the beach vibes to your backyard with a coastal-inspired bicycle planter theme. Select a beach cruiser bicycle in a weathered finish or nautical colour palette like blue, white, and seafoam green. Pair it with woven seagrass baskets, driftwood accents, and maritime-inspired décor for a relaxed coastal aesthetic.
Fill the baskets with seaside plants like succulents, dune grasses, and coastal wildflowers for a breezy, beach-inspired look. Add coastal accessories such as seashells, coral, and lanterns to evoke the tranquility of the seaside.
5. Garden Tea Party
Transport yourself to an enchanting garden tea party with a whimsical bicycle planter theme. Choose a vintage-style bicycle with a charming basket or rear rack for holding teapots, cups, and saucers. Pair it with delicate floral baskets, lace accents, and vintage china for a romantic, feminine look.
Fill the baskets with fragrant flowers like roses, peonies, and lilacs for an elegant garden party atmosphere. Add tea party accessories such as lace tablecloths, floral garlands, and vintage teacups to create a magical and memorable setting.
The Wrap Up
Creating a bicycle planter is a delightful way to add personality and charm to your outdoor space. Whether you prefer a vintage garden, urban oasis, bohemian retreat, coastal escape, or garden tea party theme, there are endless possibilities for expressing your style and creativity.
By following the steps outlined in this guide and selecting the theme that resonates with you, you can embark on a creative journey that transforms an ordinary bicycle into a stunning focal point for your outdoor space. The process of creating a bicycle planter is not only practical but also allows you to express your personality and style through gardening and décor.
First and foremost, gather your materials. Whether you’re repurposing an old bike or starting fresh with a new one, ensure you have all the necessary supplies to bring your vision to life. This may include baskets, pots, soil, plants, decorative elements, and any tools required for assembly.
Once you have your materials assembled, unleash your imagination. Consider the theme you want to achieve and how you can best incorporate it into your bicycle planter design. Whether you’re aiming for a vintage garden, urban oasis, bohemian retreat, coastal escape, or garden tea party theme, let your creativity guide you as you select colours, textures, and accessories that complement your vision.
As you begin the process of transforming your bicycle, remember to stay true to your chosen theme. Pay attention to details such as basket liners, plant selections, and decorative accents that enhance the overall look and feel of your design. Whether you’re adding lace and ribbons for a vintage garden vibe or incorporating driftwood and seashells for a coastal escape theme, every element should contribute to the cohesive aesthetic of your bicycle planter masterpiece.
As you work through the steps outlined in this guide, keep in mind the joy and beauty that your creation will bring to your garden, patio, or balcony. Imagine the delight of guests as they admire your handiwork and the satisfaction of knowing that you’ve brought new life to an old bicycle through your creativity and ingenuity.
Finally, remember that the journey of creating your bicycle planter is just as important as the finished product. Embrace the process, savour the moments of inspiration, and take pride in each step along the way. Whether you’re working alone or with friends and family, gardening is a rewarding and therapeutic activity that allows you to connect with nature and express yourself through design.
In conclusion, transforming an ordinary bicycle into a stunning focal point for your outdoor space is a fulfilling and enjoyable project that anyone can undertake. By following the steps outlined in this guide and allowing your creativity to flourish, you can create a unique and beautiful bicycle planter that brings joy and beauty to your garden, patio, or balcony for years to come. So gather your materials, unleash your imagination, and embark on the journey of creating your own bicycle planter masterpiece today.
Frequently Asked Questions
1. What materials do you need to make a bicycle planter?
To make a bicycle planter, you will need an old bicycle, two baskets (or containers) to hold the plants, moss (such as sphagnum or decorative Spanish moss), potted plants of your choice, plastic grocery bags to line the baskets, ribbons for decoration, and anything that would support the bike, such as wires or stakes.
2. Do you need any special tools or skills to make a bicycle planter?
While basic tools like scissors, pliers, and wire cutters may be helpful, you don’t necessarily need specialized tools to make a bicycle planter. The process mainly involves arranging and securing the components onto the bike, which can be done with simple hand tools and a bit of creativity.
3. How do you choose the right plants for your bicycle planter?
When selecting plants for your bicycle planter, consider factors such as sunlight exposure, climate, and aesthetic preferences. Choose plants that thrive in your local climate and require similar care conditions. Additionally, consider the size and shape of the baskets and ensure that the plants you choose fit comfortably within them.
4. Can you use any type of bicycle to make a planter?
Yes, you can use almost any type of bicycle to make a planter. Old or unused bicycles, regardless of style or condition, can be repurposed into charming planters. Whether it’s a vintage cruiser, mountain bike, or children’s bike, the possibilities are endless. Choose a bike that appeals to you and fits the overall aesthetic you want to achieve.
5. How do you prepare the bikes and baskets for planting?
Start by cleaning and inspecting the bike to ensure it’s in good condition for planting. Remove any rust or debris, and make any necessary repairs or adjustments. Line the baskets with plastic grocery bags to prevent soil from leaking out. Fill the baskets with potting soil and add moss to help retain moisture and provide a decorative touch.
6. How do you secure the baskets to the bike?
Use wires, zip ties, or other secure fasteners to attach the baskets to the bike frame. Make sure the baskets are firmly secured and evenly balanced to prevent them from shifting or falling off while in use. You may need to adjust the positioning of the baskets to achieve the desired look and stability.
7. How do you care for your bicycle planter once it’s assembled?
Regular maintenance of your bicycle planter involves watering the plants as needed, pruning any overgrowth, and monitoring for signs of pests or disease. Additionally, check the stability of the baskets and bike periodically to ensure everything remains securely in place. With proper care, your bicycle planter can continue to thrive and beautify your outdoor space for seasons to come.